

Oil Burner Diagram: Labeled Parts, Setup and Safe Use
You've unpacked a fragrance burner, set a bottle of oil beside it, and paused. Does the oil go straight into the dish? Where should the candle sit? And why do search results for an oil burner diagram also show pumps, electrodes, and furnaces?
The name describes different equipment. A fragrance warmer releases scent, while a heating oil burner burns fuel to heat a building. Knowing which parts you're looking at helps you use the right instructions and spot a problem before trying to fix it.
Table of Contents
Labeled Fragrance Oil Burner Diagram and Its Parts - Match each label to its job - Read the empty space too
Heating Oil Burner Diagram and Its Components - Heating oil burner components and the failures they cause
How Heat Turns Fragrance Oil Into Scent - Follow the warmth into the mixture - What changes the scent you notice
Choosing a Heat Source and Oil Amount - Heat source, water fill and oil drops by burner type - Match the material to the failure it prevents - Don't use extra oil to compensate for poor heating
How to Set Up Your Burner Step by Step - Prepare the location and mixture - Position, start, and stop the heat
Safe Use Rules and the Hazards Behind Them - Hazards, causes and prevention for fragrance burners - Ventilation isn't the same as a draft - Keep furnace hazards separate
Common Problems and How to Fix Them - Symptoms, likely causes and fixes - Separate an adjustment from a replacement - Clean without creating another fault
Choose the Right Burner for Your Space - Check the design before choosing the scent
Labeled Fragrance Oil Burner Diagram and Its Parts
This fragrance diagram shows a bowl warmed from below by a tea light or bulb, not a heating oil burner that burns fuel oil in a furnace. Both types appear in this guide, but their oils, controls, and troubleshooting procedures aren't interchangeable.
Start at the top of your fragrance burner and work downward. The bowl holds the aromatic mixture, the chamber separates it from the heat source, and the base supports the assembly. Electric models add electrical parts rather than a candle.
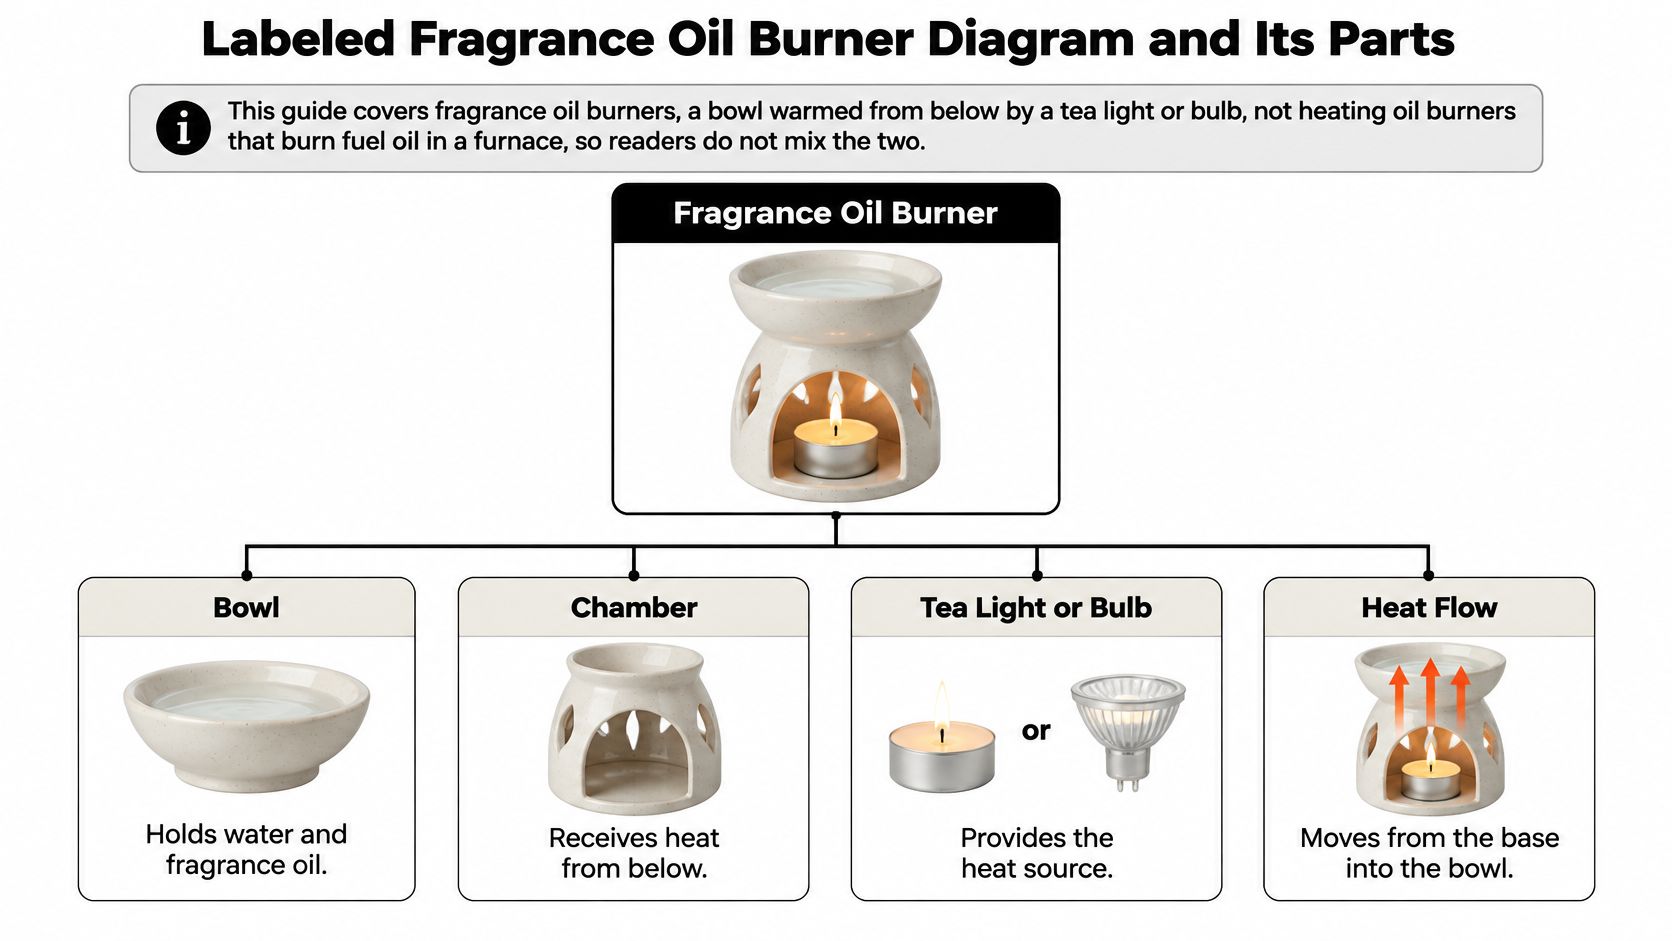
Match each label to its job
Not every burner has a visible fill line, removable bowl, or separate chamber. Use the labels to identify functions rather than expecting your model to look identical.
Label and part | What it does | What goes wrong |
|---|---|---|
A. Bowl or reservoir | Holds water and fragrance oil in a water-compatible warmer | Cracks leak liquid; accumulated residue can produce an unpleasant smell |
B. Rim and fill line | Define the bowl's edge and approved filling level | Overfilling causes spills; an absent marking makes the correct level harder to judge |
C. Heat chamber or cup | Houses the candle and directs heat toward the bowl | Damage can weaken the structure or disturb the intended heating arrangement |
D. Tea light or heat source | Supplies warmth through a candle flame or approved electric bulb | Incorrect candle size or bulb rating can cause insufficient heat or overheating |
E. Base | Keeps the burner upright and supports its weight | A rocking or damaged base increases tipping risk |
F. Bulb socket, cord, and plug | Supply electricity on bulb-powered models | Loose connections or damaged insulation require the warmer to be taken out of service |
The bowl's shape isn't a measuring instruction. A deep reservoir doesn't necessarily need to be filled close to its rim, and a decorative groove isn't necessarily a fill line. If the intended level isn't clear, check the model's instructions rather than estimating from an unrelated burner.
Likewise, don't assume every dish accepts water. Some electric warmers are intended for wax or a particular fragrance product, and putting water into the wrong appliance can damage it.
Read the empty space too
The opening around a tea light allows access and supports the burner's intended airflow. Don't pack that cavity with decorative stones, spare candles, or other objects, even if they appear to fit.
The clearance between the flame and bowl is also part of the design. Raising the candle on a makeshift stand changes that relationship and may overheat the dish.
Practical rule: Match the part to its function before replacing, filling, or adjusting it. A candle holder, wax warmer, and water-based oil warmer may look similar without being interchangeable.
Match each letter to your own burner while it's cold and empty. The table then becomes a useful reference: a leaking bowl points to A, instability points to E, and an electrical fault points to F.
Heating Oil Burner Diagram and Its Components
A heating oil burner follows a fuel path, not a fragrance-warming process. Oil travels from the storage tank through a shutoff valve and filter to the pump, then reaches the nozzle.
In conventional pressure-atomizing equipment, the pump typically supplies No. 2 fuel oil at approximately 100–300 psi, and the nozzle produces a fine, cone-shaped spray, according to ASHRAE's automatic fuel-burning systems guidance. The burner motor drives a forced-draft fan, which supplies air around and into that spray, while the ignition assembly provides the spark.
Heating oil burner components and the failures they cause
Component | Function | Failure it causes |
|---|---|---|
Shutoff valve and filter | Stop and clean the oil supply | A clogged filter starves the flame |
Fuel pump | Raises oil to the specified atomizing pressure | Insufficient pressure can cause poor atomization and sooting |
Nozzle | Atomizes oil into a fine cone | Wear or blockage distorts the spray and can produce soot |
Blower fan | Forces combustion air into the spray | Fan failure can allow dangerous overheating or hot gases to travel backward |
Electrodes or igniter | Create the spark that lights the oil | Ignition failure can leave unburned oil in the chamber |
Flame detector and primary safety control | Verify flame and stop fuel delivery when required | A failed safety chain can permit abnormal unburned-oil discharge |
The primary control isn't an on/off switch. UL's oil-burner standard requires automatic primary safety controls that restrict abnormal oil discharge following ignition failure or flame loss.
Heat transfers through the appliance's heat exchanger, while combustion gases leave through the flue. For a plain-language explanation of the furnace side, Bender's Oil Service Inc. describes how an oil furnace heats your home.
A complete diagram separates fuel, electrical controls, combustion air, and exhaust. NFPA's standard for stationary liquid-fuel installations addresses these systems and their associated installation requirements.
These failures can interact. Insufficient air can impair combustion, and accumulated oil creates a restart hazard; Weishaupt's burner instructions warn against starting equipment when excess oil or vapor is present. Don't repeatedly reset a locked-out burner or bypass its safety control.
How Heat Turns Fragrance Oil Into Scent
A fragrance burner should warm its contents, not burn them. The scent you notice comes from aroma molecules evaporating into the air, rather than from oil being consumed in a flame.
With a tea-light model, the flame heats the underside of the bowl through the chamber. With a bulb-powered warmer, the approved bulb supplies that warmth. Heat then passes through the bowl into its contents.
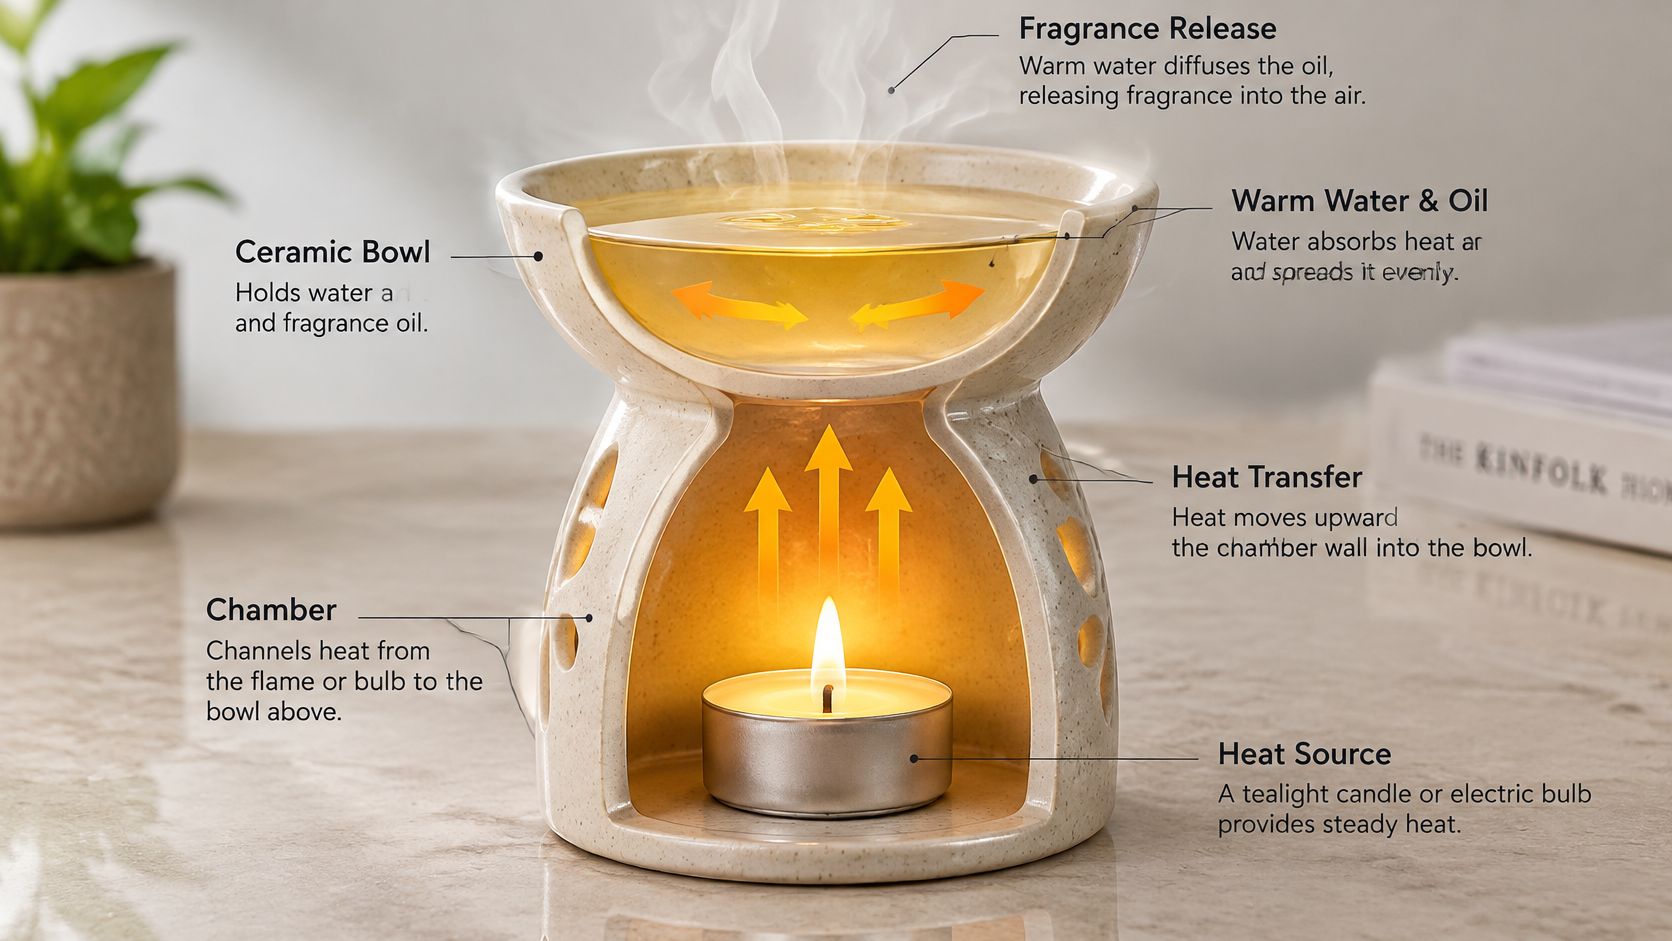
Follow the warmth into the mixture
In a burner designed for water and oil, the water absorbs heat and helps moderate the temperature while liquid remains. Fragrance oil may float, form droplets, or spread across the surface. It doesn't have to dissolve completely to release an aroma.
As the mixture warms, volatile fragrance components enter the air. Air movement carries them away from the bowl and through the room, although the result won't necessarily smell equally strong in every corner.
A dry dish behaves differently from a filled, water-compatible bowl. Without the intended liquid, residue can heat sharply and develop a scorched smell. Don't interpret that stronger, harsher odor as better fragrance performance.
What changes the scent you notice
Heat input: An unsuitable candle or bulb can leave the bowl too cool or make it excessively hot.
Exposed surface: A broad, shallow bowl presents a different liquid surface from a narrow, deep reservoir.
Room airflow: Gentle circulation distributes scent, while strong drafts can disturb a candle and carry fragrance away from where you're sitting.
Say you place the same approved fragrance mixture in compatible burners in an open living room and a sheltered reading corner. You may notice the scent more readily in the smaller area without either burner being faulty.
Oil suitability matters too. Aroma Warehouse's guide to fragrance oil uses offers context for choosing an application, but the warmer and oil instructions must agree.
A pleasant aroma doesn't require visible vapor. Smoke, harshness, or a burnt smell is a reason to stop heating, not increase the dose.
Understanding heat, surface area, and airflow helps distinguish a slow warm-up from overheating. It also prevents the common mistake of treating every weak scent as a shortage of oil.
Choosing a Heat Source and Oil Amount
Match the heater to the mixture, and both to the bowl. Most burner failures trace back to one of these three parts: a heat source that runs too cool leaves the scent flat, one that runs too hot scorches the liquid, and the wrong dose underperforms or overwhelms. The table below shows how each common combination behaves and where it tends to go wrong.
Heat source, water fill and oil drops by burner type
Burner type | Heat source | Water fill | Oil drops | Burn limit |
|---|---|---|---|---|
Ceramic dish with tea light | Manufacturer-approved tea light | Marked level, if designed for water | Start with the lowest dose on the oil label; add fragrance only to a filled, cool bowl | Stop the candle once the liquid runs low, or sooner if the mixture smells scorched or starts to smoke |
Glass bowl with tea light | Approved tea light, heat-resistant glass only | Marked level, if designed for water | Same low-start rule; the clear bowl lets you confirm the fill before dosing | Stop the candle once the liquid runs low; watch for scorching where thin glass heats unevenly |
Electric warmer | Approved bulb at the labeled wattage | Only if the appliance accepts water | Lowest listed dose first; adjust only after a full session proves the scent is weak | Unplug when the liquid runs low or the aroma turns harsh; the warmer keeps heating as long as it is on |
Match the material to the failure it prevents
Each burner design exists to solve a specific problem, so read the choice backward: ask which failure it guards against.
Ceramic holds heat steadily and suits people who enjoy a candle ritual and can stay nearby. Weight feels reassuring, but weight alone doesn't guarantee stability. Check that the base sits flat and that the candle drops in without being wedged. A tilted flame heats one side of the dish harder, and the liquid on that side scorches first.
A glass bowl makes the contents visible, which helps you catch a low fill or darkened residue before it burns. Ordinary decorative glass is no substitute for heat-rated glass, though. Uneven heating builds stress in unsuitable glass until it cracks.
Electric warmers remove the open flame, along with the draft sensitivity and wick problems candles bring. The bowl, bulb, and housing still get hot, and the cord needs protection from pinching, snagging, and spills. For a closer comparison of convenience and limitations, see whether electric fragrance burners suit your routine. The question that matters is which model you can run correctly in your space, session after session.
Don't use extra oil to compensate for poor heating
More fragrance can raise scent intensity, but it cannot fix a cold bowl, a failed bulb, or an undersized candle. If the aroma is weak, confirm the burner is reaching temperature before touching the dose. Any permitted adjustment belongs in the next cold setup, where you can measure it cleanly rather than tipping oil into a hot dish.
Keep the mixture below the approved fill level. A bowl filled to its lip can spill when you position it, reach past it, or disturb the liquid.
A candle's remaining burn time isn't the bowl's safe operating limit. The liquid may run low or scorch long before the candle burns out, so treat the liquid level and the smell of the mixture as the stopping signal rather than the flame.
How to Set Up Your Burner Step by Step
Begin with the burner cold, the candle unlit, and any electric model unplugged. Keep the product instructions beside you so the fill level, fragrance compatibility, and heat source are clear before you start.
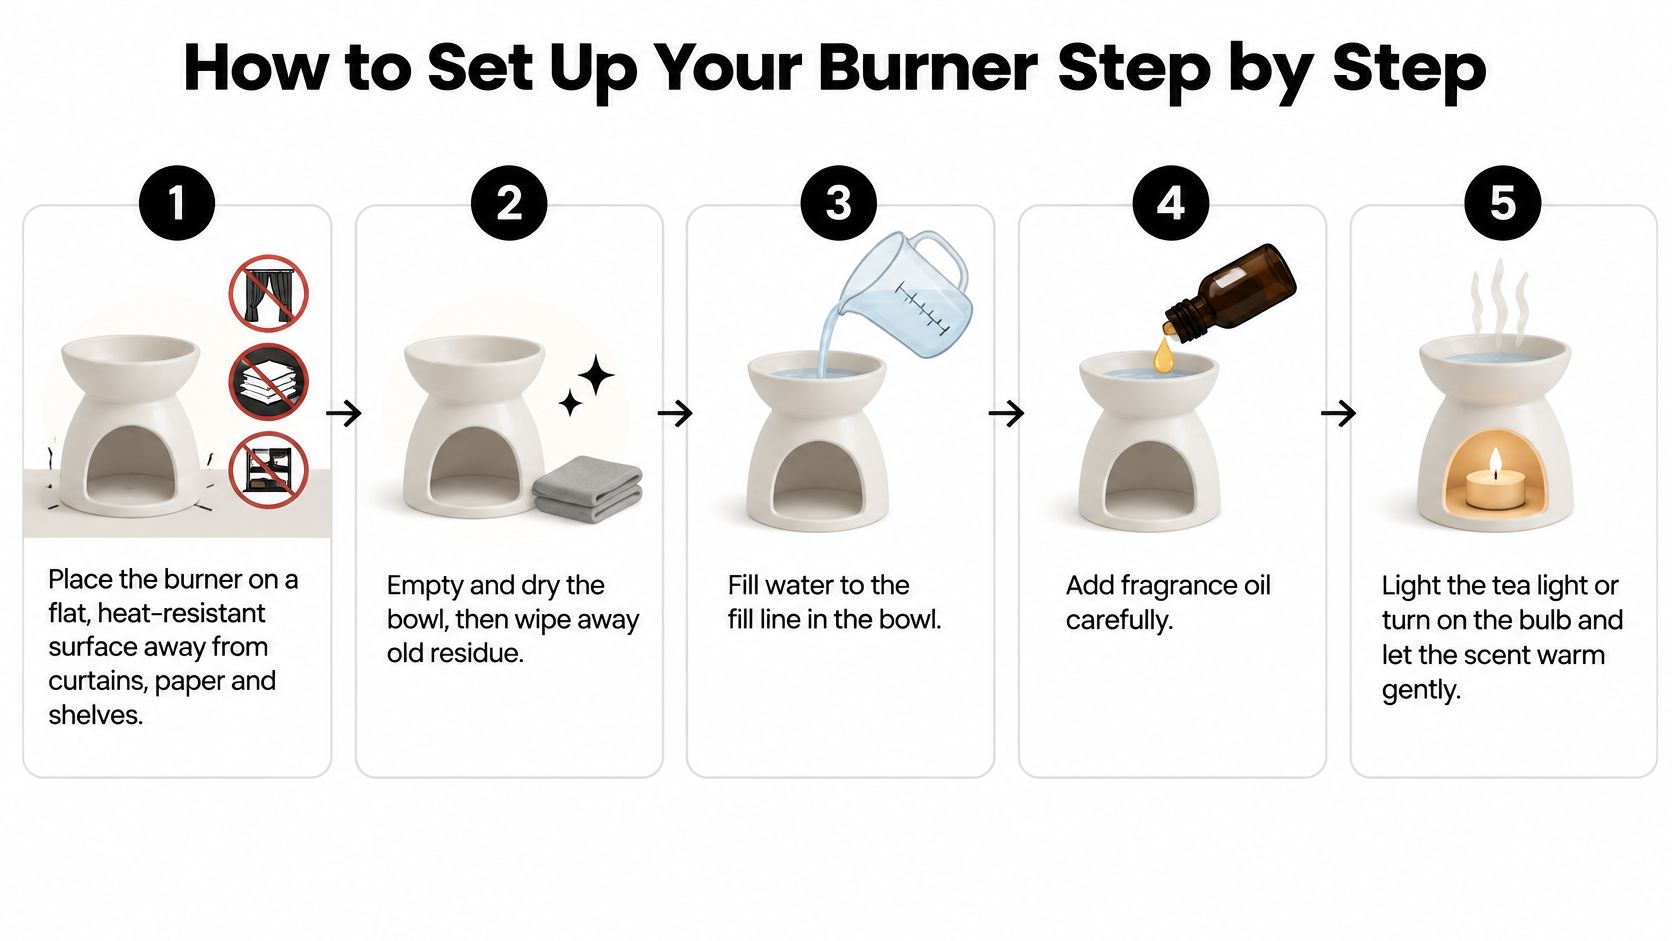
Prepare the location and mixture
Choose a suitable surface. Set the burner on a flat, heat-resistant surface with clear space above and around it. Don't tuck it beneath a shelf or place it beside curtains, paper, or trailing plants.
Inspect and clean the bowl. Remove old liquid and residue, then check the bowl, chamber, and base for damage. The common slip is covering an old deposit with a fresh mixture, which makes it harder to identify the source of an unpleasant odor.
Add the approved water fill. If the model uses water, fill to its marked level or the level specified in its instructions. Don't add water to a wax-only or oil-only appliance.
Measure the fragrance carefully. Use the amount specified for the compatible oil and warmer, preferably with a dropper that allows controlled dispensing. Don't pour freely from a large bottle or assume that a larger reservoir needs a concentrated mixture.
Position, start, and stop the heat
Center the approved tea light. Place it upright in its holder, with no improvised support underneath. If you're unfamiliar with its construction, this explanation of what a tea candle is helps distinguish it from other candle formats.
Light it without reaching over the flame. Use a suitable long lighter or match and keep your hand, sleeve, and hair clear. For an electric model, confirm that the bowl is seated correctly, then plug in and switch on as directed.
Allow a supervised warm-up. Let the appliance reach its normal operating condition without moving it or adding fragrance to the hot bowl. If the expected scent doesn't develop, stop and investigate rather than changing several things while it's running.
Shut down before handling. Extinguish the candle carefully or switch off and unplug the electric warmer as instructed. Let everything cool fully before emptying, cleaning, or moving it.
Before lighting: Make sure you can stay nearby for the session. If you're about to leave the room, postpone it.
A working burner should produce a gentle scent without smoke, spitting liquid, a scorching odor, or an unstable flame. Judge the result from a comfortable distance rather than leaning over the heated mixture to check it.
Keep a simple note of the fragrance, approved dose, and burner used. That gives you a repeatable starting point without relying on memory or making adjustments to a hot appliance.
Safe Use Rules and the Hazards Behind Them
Leaving a burner unattended turns a manageable problem into one you may not notice. A shifted candle, spilled mixture, or drying bowl needs someone present to shut the appliance down.
A small flame still needs deliberate placement. Treat the following table as a pre-use checklist rather than assuming that a decorative burner is safe wherever it looks attractive.
Hazards, causes and prevention for fragrance burners
Hazard | Cause | Prevention |
|---|---|---|
Fire from nearby materials | Tea light placed near curtains, paper, or plants | Maintain a clear area on a stable, level, heat-resistant surface |
Burns from hot bowl or chamber | Touching the burner during use or cooling | Let it cool fully before handling; use its intended lifting points |
Tipping and spills | Uneven surface, snagged cord, pets, or children | Choose a secure location out of reach, never a bed or soft covering |
Unattended flame | Leaving a lit candle while away or asleep | Extinguish it before leaving the room or going to sleep |
Cracked or overheated bowl | Unsuitable material or a water-based bowl running dry | Use the intended vessel and stop heating before its contents are depleted |
Ventilation isn't the same as a draft
Give the room ordinary ventilation without placing the candle directly in the path of a fan, vent, or open-window gust. A direct draft can make the flame lean or flicker against the burner.
Avoid using fragrance in a tiny enclosed space where the odor quickly becomes uncomfortable. If anyone experiences irritation, coughing, headache, or breathing discomfort, stop use and move to fresh air; persistent or severe symptoms warrant medical attention.
A stronger fragrance isn't automatically a better indoor environment. Consider who shares the room and whether fragrance-free air would be more comfortable. The guide to choosing a safe air freshener provides additional considerations for a shared space.
Keep furnace hazards separate
A fragrance burner's smell cannot tell you whether a heating appliance is operating safely. For households with combustion heating, carbon monoxide guidance from Covenant Aire Solutions explains why furnace safety deserves separate attention.
Don't use fragrance to cover a fuel odor or an unexplained burning smell. Shut down the relevant appliance when safe, follow its emergency instructions, and arrange qualified help.
Before each use, check the location, vessel, heat source, and your ability to supervise it. If any of those checks fail, leave the burner off.
Common Problems and How to Fix Them
Start troubleshooting with the symptom, then locate the associated part on the oil burner diagram. A weak scent and a burnt odor need different responses, even though both may tempt you to add more oil.
For any problem involving heat, liquid, or candle position, shut the burner down and let it cool before making changes. Don't reach into a lit chamber to center the tea light.
Symptoms, likely causes and fixes
Symptom | Likely cause | Fix |
|---|---|---|
Weak or no scent | Cold bowl, insufficient heat, unsuitable fragrance, or an inadequate approved dose | Check the heat source and allow supervised warm-up; adjust the next cold mixture only within label directions |
Oil smokes or smells burnt | Dry bowl, excessive concentration, overheating, or old residue | Stop heating, cool completely, clean, and prepare a correct fresh mixture |
Black soot on the bowl | Flame contacting the underside, unsuitable candle, or wick problem | Extinguish, cool, clean, and check candle suitability and wick instructions |
Oil crust or film | Residue left after use | Clean the cooled removable bowl with warm soapy water if permitted |
Flickering or uneven heat | Draft, uneven base, or crooked tea light | Stop use, correct the location, and reseat the candle after cooling |
Crack in bowl or chamber | Heat stress, impact, or unsuitable material | Stop using the damaged part and replace it |
Separate an adjustment from a replacement
A poorly positioned candle may be straightforward to correct once everything is cold. A cracked bowl isn't a cleaning problem, and a damaged electrical socket isn't a reason to try a higher-wattage bulb.
Don't glue a cracked vessel and return it to heat. A repair that appears watertight at room temperature may not be suitable for repeated warming.
For soot, check the complete candle-and-burner fit rather than trimming the wick automatically. Follow the candle maker's wick guidance, and replace a candle that continues to burn abnormally.
Clean without creating another fault
Remove loose residue with a soft cloth after the bowl has cooled enough to handle safely. Wash a removable bowl only by a method its maker permits, then dry it before reuse.
Keep electrical bases, sockets, switches, and cords out of the wash water. Avoid abrasive scraping that could damage the glaze or glass.
Heating oil equipment needs a different diagnostic approach. EPA combustion guidance connects burner adjustment with smoke, draft, and combustion measurements, not appearance alone. Leave furnace nozzle, pump-pressure, ignition, and air-setting work to a qualified technician with the appropriate instruments.
Choose the Right Burner for Your Space
Choose for the location and your routine, not just the appearance. A tea-light dish can suit a clear kitchen counter or supervised sitting area, provided it's separated from cooking clutter and other combustible materials.
For an office or bedroom where you don't want an open flame, consider a compatible electric warmer. That isn't permission to leave it running while asleep, and workplace rules may prohibit heated fragrance appliances altogether.
Check the design before choosing the scent
Readable instructions: Look for an identifiable model, permitted contents, and clear operating guidance.
Practical reservoir: Choose a bowl whose approved filling level is easy to recognize and whose surface is accessible for cleaning.
Stable construction: Check for rocking, loose parts, awkward cord routing, and difficult candle access.
Appropriate material: A glass model must be intended for the supplied heat source, not merely described as decorative glass.
If you prefer a different way to distribute fragrance, compare the operating method of an ultrasonic aroma diffuser. Don't transfer warmer instructions to a diffuser, since its reservoir and compatible oils may have different requirements.
Choose fragrance oil explicitly suited to the appliance and keep the bottle closed between uses. A clearly labeled bottle also helps prevent accidental substitution with cleaning products or heating fuel.
Today, choose a burner type, complete the setup routine with a compatible test scent, and record the approved amount you used. Inspect it again after cooling, and replace any part showing cracks, loose fittings, or wear before the next session.
Frequently Asked Questions
Can You Mix Two Different Fragrance Oils in an Oil Burner?
Yes, you can mix two fragrance oils if both products are specifically suitable for your warmer and their manufacturers permit blending. Start with a small amount of each, follow the recommended usage directions, and avoid combining oils with unknown ingredients or incompatible applications.
Can You Reuse Fragrance Oil After Heating It in a Burner?
It is generally better to use a fresh mixture for each session. Heating changes the balance of volatile fragrance ingredients, so leftover oil may smell different or produce a weaker aroma. Allow the burner to cool, dispose of the used mixture according to product directions, and prepare a fresh batch next time.
Can You Put Fragrance Oil Directly Into a Wax Warmer?
Only if the manufacturer specifically states that the warmer accepts liquid fragrance oil. Traditional wax warmers are designed for wax products, and adding liquid oil or water can cause spills, residue buildup, or appliance damage. Always check the manufacturer's approved materials before substituting products.
How Should Fragrance Oils Be Stored to Maintain Their Scent?
Store fragrance oils in tightly closed, compatible bottles in a cool, dry location away from direct sunlight and temperature fluctuations. Keep bottles upright and away from heat sources. Proper storage helps protect fragrance quality and reduces the risk of leaks or accidental spills.
What Should You Do If Fragrance Oil Spills Inside an Electric Warmer?
Turn off and unplug the warmer if you can do so safely, then allow it to cool completely. Follow the manufacturer's cleaning instructions and keep liquid away from the electrical socket, cord connections, and switches. Never plug the appliance back in while moisture or oil remains near electrical components.
We offer oil warmers, burners, fragrance bottles, and droppers, and we pour our fragrance oils fresh upon order. Visit Aroma Oil Burner Warehouse to explore fragrance accessories and oils, then match your selection to your burner's instructions for a careful first setup.


